Aerophone Playing Posture, Part 2: A Grip That Saves Your Thumb and Wrist
🌐 Read this article in Japanese(この記事を日本語で読む)
Hi, I'm Shuko.
In Part 1, I covered how to sit, how to straighten your back, and how to adjust your strap position.
In this Part 2, I share tips on how to hold the Aerophone and how to stand while playing. These are the parts of posture most connected to hand pain.
- Sit on the front half of the chair, with both feet flat on the floor.
- Straighten your back gently. Watch out for leaning forward and for a chin that rises or drops too far.
- Keep your face angle fixed. Bring the Aerophone to your mouth, then adjust the strap length.
After I started paying attention to my posture, my body pain dropped greatly and I could practice longer. I came to love the Aerophone even more!
Posture does not improve overnight. The key is to continue, little by little, without rushing. One day, you will suddenly notice, "This feels a little easier!"
The best posture also depends on your body type. Please read this as one example from a player who is 154 cm (5 ft 1 in) tall.
Like Part 1, this article is a record of what I worked out during my first two years with the Aerophone, from 2022 to spring 2024.
Contents
Finding the Cause of My Thumb and Neck Pain
First, let's look again at my old playing posture. I showed this photo in Part 1.
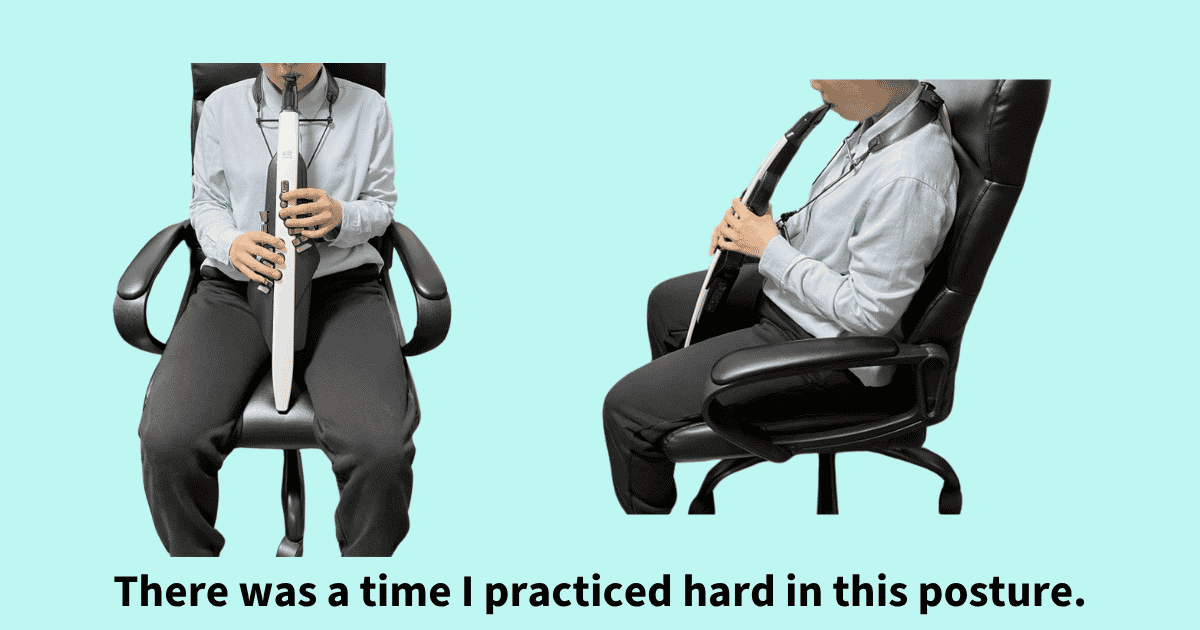
This was far from the posture I am aiming for now. But at the time, I had reasons to practice this way. The chair carried the weight of the instrument, which gave me these benefits:
- Less strain on my neck
- Less pain in my right thumb
At home, I practiced in this posture. At lessons, I somehow endured the pain in my neck and right thumb for 30 minutes.
I felt that something was wrong. But this posture was the most comfortable one I knew, so I had no idea what to fix or how.
Then, with my teacher's advice at lessons, I improved my posture step by step. At last, I found the causes of the pain!
- Neck pain: I did not understand how to use the strap correctly.
- Right thumb pain: I was holding the instrument the wrong way.
I covered the strap in Part 1. So in this Part 2, the main topic is how to hold the instrument.
How to Hold the Aerophone and Keep It Balanced
Once your chair and strap are set, the next step is how to hold the Aerophone. There are three points:
- Protect your right thumb
- Keep your upper arms close to your body
- Balance the instrument
Try taking your thumb off the thumb hook
If your right thumb hurts during practice, you are very likely resting the weight of the Aerophone on your thumb. That was exactly my case. I explain the causes in detail in the article linked above, so here I focus on the holding technique itself, as one part of your whole posture.
When you press your thumb firmly against the thumb hook, it is easy to push upward without noticing. The instrument then rests on your right thumb, and the thumb starts to hurt.
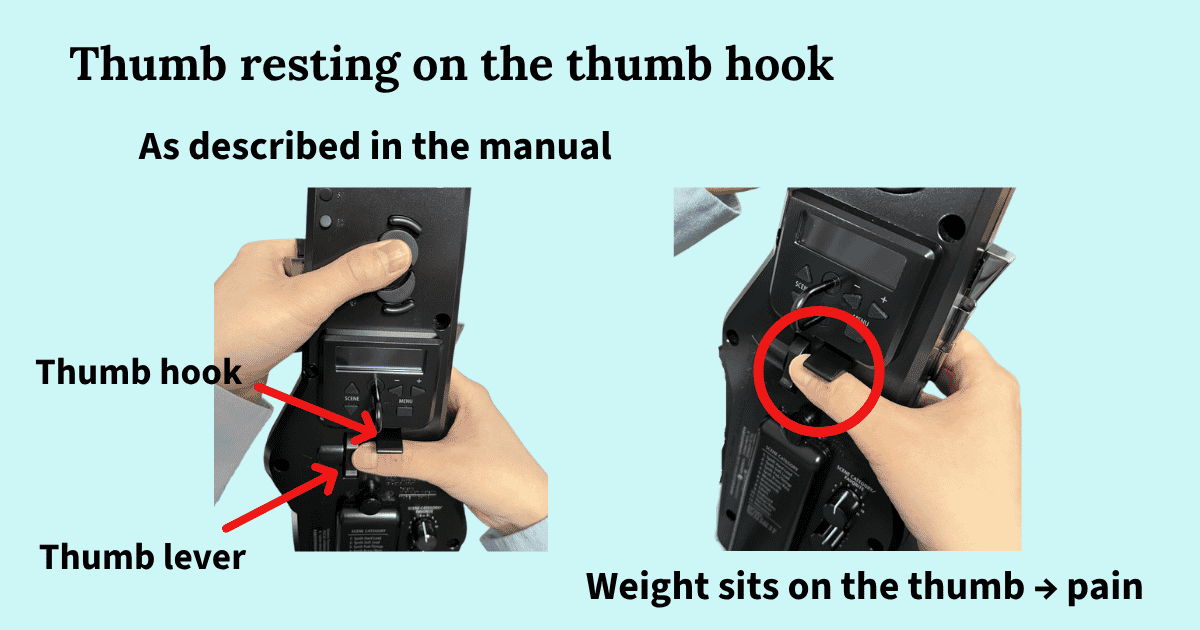
I read blogs by saxophone players and tried many things. The answer I arrived at was this: take your thumb off the thumb hook.
When you move your thumb slightly away, you can push forward instead of upward. This reduces the pain in your right thumb.
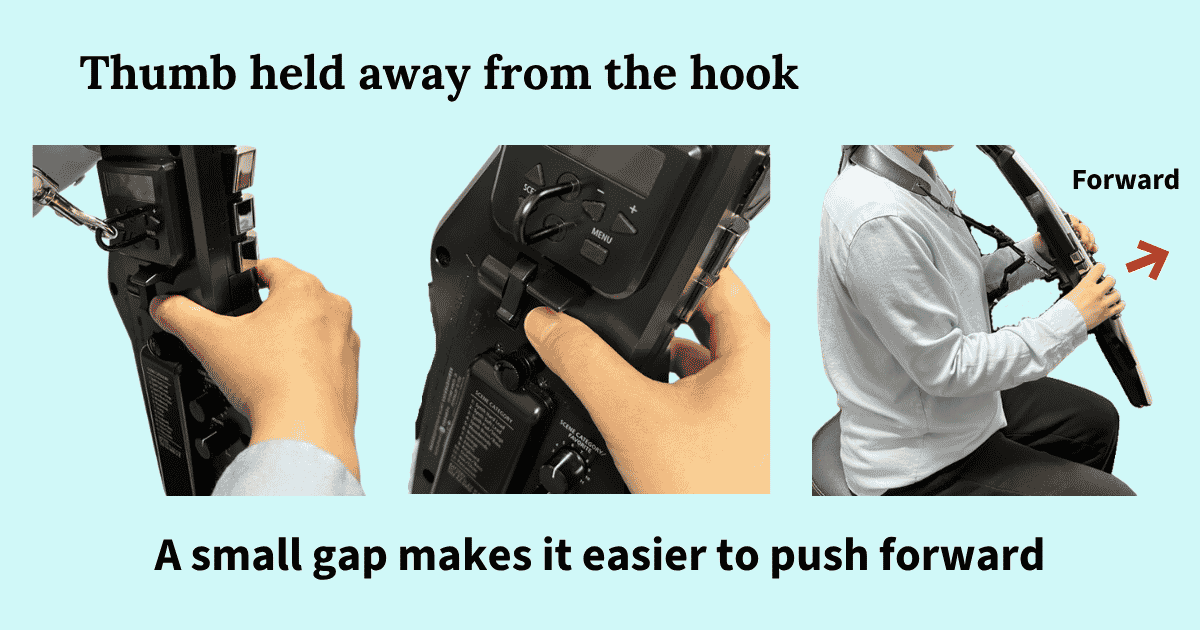
One key point: the contact point between the instrument and your thumb should be the side of the thumb. If you push forward with the pad of your thumb, your palm bends backward, and this time your wrist starts to hurt.
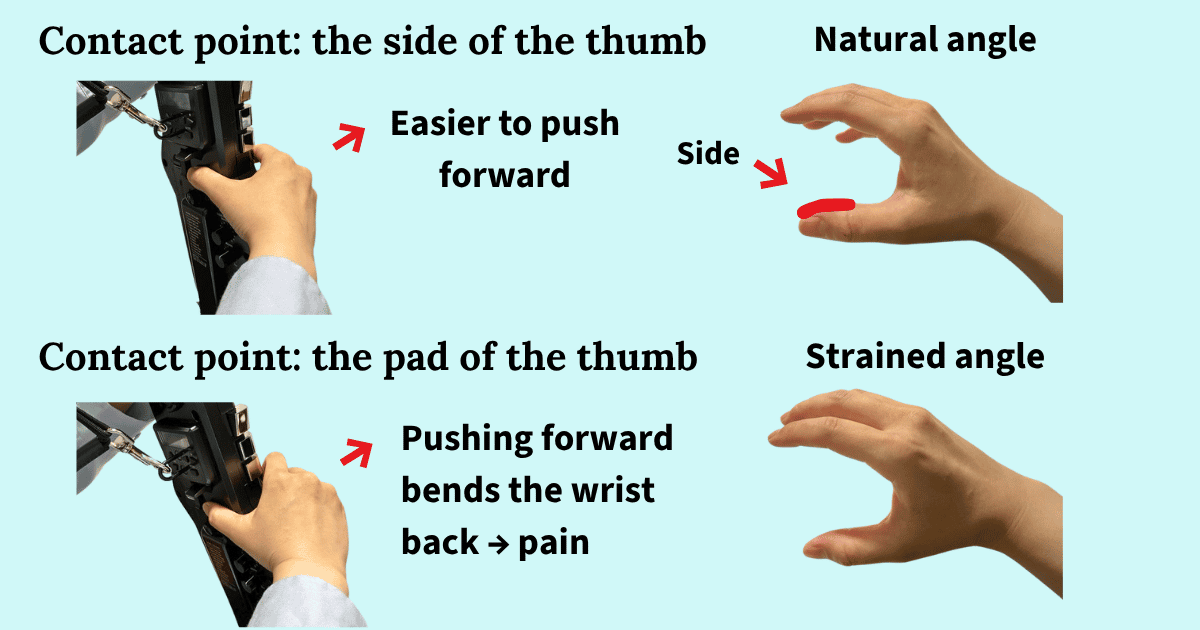
Imagine holding a water bottle or a log in a loose, gentle grip. This image helps you relax.
- Right thumb: do not use it to carry the weight. Use it only to make small adjustments to the instrument's angle.
- Left thumb: rest it lightly on the thumb rest, in a position where you can press the octave keys at any time.
The weight of the instrument goes to your neck and shoulders through the strap, not to your thumbs.
This alone greatly reduces the strain on your thumbs.
Some players feel more stable with the thumb resting firmly on the thumb hook. If that is you, keep your thumb there, but change the direction of the force: push forward, not upward. This also reduces the pain.
One note: the shape of the thumb hook differs by model. For example, the AE-10 has a much larger thumb hook than the AE-20, and it is easier to rest your thumb on it. But the basic tip — direct your right thumb's force forward — is the same on every model. (The AE-10 is no longer in production.)
Keep your upper arms close and your wrists at a natural angle
When extra tension builds up during playing, your shoulders rise, and you start to support the instrument with your thumbs alone.
As I mentioned above, when you push the instrument forward with the pad of your right thumb, your upper arms naturally drift away from your body. Then your wrist bends backward, and this can lead to wrist pain.
The tip here: keep your upper arms lightly close to your body. When you do this, the contact point naturally becomes the side of your thumb, and your wrist returns to a comfortable angle.
Release the tension in your arms and let the strap carry the weight. This makes it easier to relax.
In my case, when my upper arms drift too far out, my arms rise and tire quickly. So I rest my elbows lightly against my sides. But when I relax my arms too much, my face drops down, and I start to bite my lower lip hard. Finding this balance is truly difficult.
Take breaks often, and build the feel for it little by little.
Balance the instrument at three points
Once your grip and arm position are settled, the last step is the balance of the whole instrument.
Sometimes only your mouth and your two thumbs are touching the instrument. For example, this happens on middle C sharp, the fingering where you release all the keys. At these moments, the instrument wobbles and loses balance easily.
When this happens, think of balancing the instrument at three points: the strap, your front teeth, and your thumbs. This makes the instrument much more stable.
Roland Aerophone AE-20
See full specs and details on the official page:
Roland Aerophone AE-20 — Official Product Page
Playing While Standing, and How to Avoid an Arched Back
Next, some points for playing while standing. The basics are the same as playing seated, but pay attention to these points:
- Stand with your back straightened gently.
- Open your feet about shoulder width, so your base is stable.
- Adjust the strap length at the position where your chin does not rise or drop too far.
- Set your music stand height so that your eyes do not drop too low.
There is one thing I pay attention to in both sitting and standing posture: do not let your lower back arch.
When you focus on playing, the tension in your stomach fades without you noticing, and your lower back starts to arch. So I try to support my body with my core.
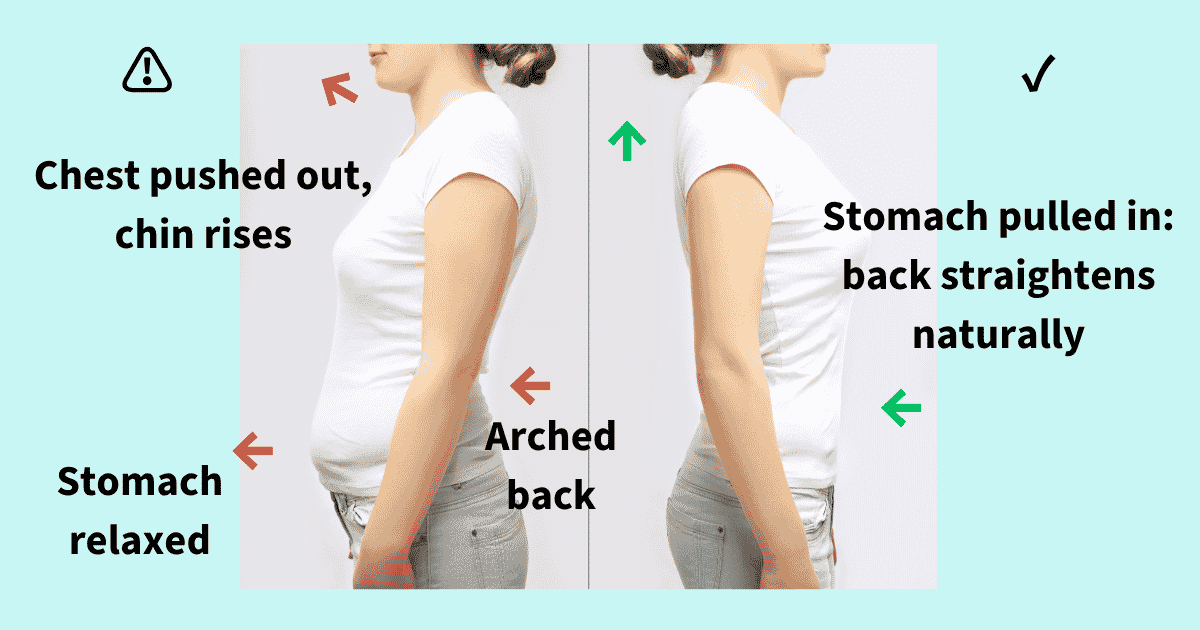
When your stomach relaxes and your lower back arches, your chin rises with it. It can also lead to lower back pain. If your abdominal muscles are not strong, your lower back arches more easily.
When you can support your body with your core, your breath control also improves.
Summary
Across Part 1 and Part 2, I broke down Aerophone playing posture into small parts. Here is a review of all the points:
- Sitting: sit on the front half of the chair, with both feet flat on the floor.
- Back: keep a little tension in your stomach to stop your lower back from arching, and straighten up.
- Strap: without changing your face angle, adjust the length so the mouthpiece comes right to your mouth.
- Grip: do not rest the weight on your right thumb. Move it slightly off the thumb hook, and direct its force forward.
- Arms: keep your upper arms lightly close to your body, so your wrists stay at a natural angle.
- Balance: stabilize the instrument at three points — the strap, your front teeth, and your thumbs.
Saying all this is easy. Doing it is hard. But the biggest key to enjoying long practice sessions without straining your body is this: hold the instrument in a relaxed state, with as little extra force as possible.
The right form differs with your body size and hand size. I hope these notes give you some small hints for finding a form that feels comfortable for you.
Two years on from where this record ends
I wrote the original version of this article in April 2024. This grip is still my standard today, and the thumb and wrist pain has not returned. Bending with the thumb lever, which I could not do at all back then, now works in slow phrases.